(This article has been moved from my previous domain hyperbrain.me to this location.)
A camper van is a fantastic travel companion. No need to check into a hotel, no caravan to drag behind your car, much comfier than a tent. But most solutions out on the market are expensive. Others require that you do a full conversion of a vehicle, meaning you’ll lose seats and flexibility. This is why I started checking around for something that I could build myself on a small budget whilst still keeping my car in original condition to be able to bring passengers and maintain the loading space.
After having done some research I decided that the best solution would be to create a foldable platform that I can take out whenever I need the full loading space. I looked at other people’s solutions but none of them presented the full flexibility that I wanted, so I decided to create my own one.

This article shows you how I created a DIY camper van solution for my Renault Kangoo (first generation) for under 200 Euro! It should be possible to use the same principle for other car models such as the Citroën Berlingo, Opel Combo, VW Caddy, Peugeot Partner, Dacia Dokker and many more, but the measurements given here are for the Renault Kangoo I.
A small disclaimer before we start: I cannot take any responsibility for you hurting yourself working with power tools, squeezing your fingers in the brackets or for the platform not fitting your specific car. I’m just showing how I did it and you’re free to try it out yourself and make modifications as you seem fit. All drawings, photos and instructions are mine and may only be used for private purposes. You’re welcome to share them if you link back to this article.
Materials for your camper van platform
You will need the following materials to build a platform similar to mine:
- One phenolic plywood board, 15-18 mm thickness cut as in the diagram shows below
- 4 foldable brackets able to carry ca 75 kg each
- 4-6 hinges (or 2 piano hinges)
- Screws (long enough to sit properly in the board but short enough to not stick out on the other side)
- 1.5-2 meters of strong rope or cord (I used 6 mm polyester cord)
- 2 yoga blocks or other solid blocks of cork, wood or similar
Here you can download a PDF (click on the picture for download) depicting the needed materials:

I had the board cut directly in the hardware store where I bought it. Phenolic plywood is an excellent choice since it’s water resistant and sturdy. It’s commonly used as flooring in trailers etc meaning it can take a lot of weight. (I could probably have built with a thinner material, but I wanted to make sure my plaform lasts.)
You will also need a drill, a screwdriver, a file or sandpaper, a knife or scissors, a measuring tape and a pen.

Let’s get started
Once you have all the materials gathered it’s time to assemble them.
Start with drilling holes in the front board. I put them a few cm from each edge and rounded off the edges to make sure they don’t cut into the rope/cord later. Cut two pieces of rope/cord around 80-100 cm each and tie as loops through the holes. You can adjust the length later with the platform in place.

Add the brackets and sides.
To be able to fold the platform the times you need your full trunk space in the car you will need to add foldable brackets. My platform is only 10 cm thick once it’s folded down.
Put the top back piece and lay it face down. Open the brackets. Put one side piece standing against the edge leaving 2-3 mm and then put the brackets in a suitable position. Around 2-3 cm from the front and back edges of the top board should be enough to make it easier to store boxes, bags etc under the platform.

Mark the positions of the brackets + the screw holes on the top board and the side. Do the same on the other side.

Pre-drill the holes. Attach the brackets with screws to the top board and the sides.


As a small side note; I figured out too late that it was smarter to extend the side parts to support the mid-section against them. That’s why my platform has extension pieces on the sides. The measurements given in the drawing removes this issue as the side parts will stick out and hold the back of the mid-section directly. My solution to the mistake can be seen below:

Add the mid-section
To add the mid-section you need to put your platform standing up. Put the middle section to touch the edge of the back section. Easiest way to do this is to support the piece on a box or some books to make sure it stays in line when you attach the hinges.

Attach the hinges (2-3 depending on type, or one piano hinge) with screws. I used piano hinges for my platform but if I would have built it today I would have used three small hinges (right, middle and left on each section) instead as the piano hinges tend to bend up at the edges and can damage your mattress.
Attach the front section
Turn your platform over on its back again. Put the front section edge on edge with the middle section and attach the hinge(s) with screws.

Your platform is now done! It’s really as simple as that.

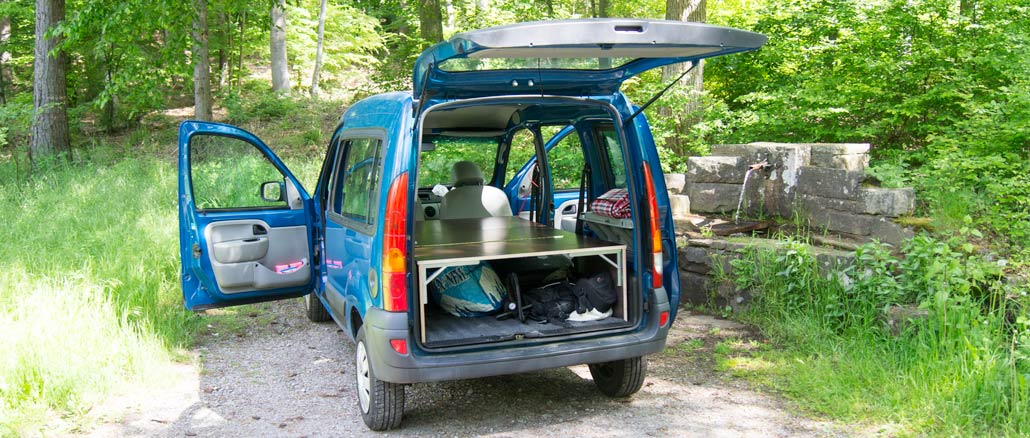
Fold your camping platform together and carry it out to your car to try it out. As you can see it’s very compact when folded down.

How to use your DIY camper van platform
The platform fits standing up in your trunk behind the seats. To use it you need to fold your back seats down and push your front seats forwards to make it fit.

Put the yoga blocks on the back of the folded back seats. Fold out the platform and attach the loops to the belt holders. You can adjust the loops and/or the belt holders to make sure some of the weight is supported on them. Make sure to be careful with the belts. You don’t want the cord to cut into them and create damage.

Tips for sleeping comfortably in your camper van
An inflatable mattres, sleeping pad or foam mattress is a must to sleep comfortably. I also recommend that you create some form of curtains for the windows. I bought sun-reflective fabric and cut into fitting pieces, zig-zagged around the edges and attached magnets to make it stick to the window frames. A simple but effective solution and it takes up almost no space in the trunk folded away.

I hope you got inspired to build your own camper van platform. I’d love it if you share a link to your own build in the comments below. And please share the article with other people you think might want to try this out. 

Enjoy the camping season!
mycket bra plan. väl genomtänkt, så flexibel. Jag ska göra det också. Vilken tjocklek på plattan som är bäst för mig. Jag vill inte att den ska vara för tung. vad skulle vara bäst. 9mm, 12mm, 15mm? Vänliga hälsningar,
Bert Kusters
Hej Bert. Kul att du uppskattar instruktionen. 🙂 Jag har för mig att jag använde 12 mm (formplywood) till min konstruktion och då blev den både stark nog för att bära upp två personer och inte för tung. Jag kunde själv bära den och lyfta den in och ut ur bilen. Det gick åt en knapp skiva till att bygga plattformen och en skiva väger under 10 kg. Sen tillkommer vikten för konsoler, gångjärn och skruv så totalt blir det runt 10-12 kg för hela konstruktionen.
Tack för ditt svar. Kan du kontrollera att 12mm? på bilderna ser det ut som 15 eller 18, men det är svårt att säga.
Jag har tyvärr inte kvar plattformen då jag sålde bilen för några år sedan. Det bästa är nog om du kollar hållfastheten på de skivor som finns att köpa där du är och gör en beräkning utifrån det. Det är ju även en fråga om hur mycket vikt du räknar med att belasta plattformen med. Rent viktmässigt så skiljer sig de olika skivorna bara med några kilo så vill du vara på den säkra sidan så tar du en lite tjockare.